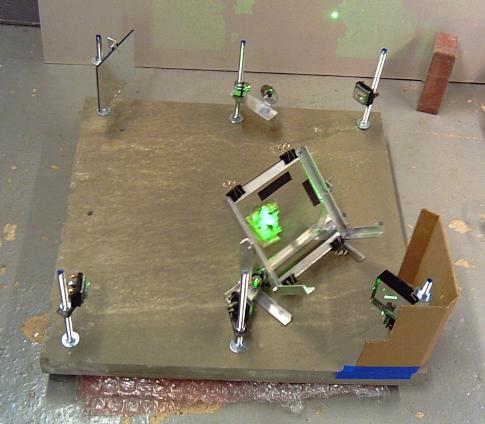
This is the second version of my holography table. The first one was a recycled crate lid, needless to say it didn't work very well. (BUT, it did work...)
This one is made from a two inch thick chunk of Pennsylvania flagstone. It is 29.5 inches square, and weighs about 130 pounds or so. So, its still a light-weight as far as real holography tables goes. But, it also works, and only cost $25. I got it from Sissler's Stone. They also have flagstone which is flat on all 6 surfaces, but that costs more like $200. It apparently comes in chunks up to 30 inches wide and 8 feet long.
I suspect the reason it works is that my basement has been pretty quiet sofar, and all the optics are bolted down. When I had an interferometer assembled, you could pluck a mirror, like a tuning fork. The settling time from that was sub-minute.
Click on the image above, to see close-up images of the various bits.
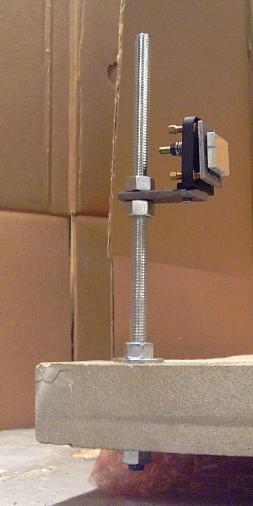
The vertical rods are 12 inch long 1/2 inch threaded rod. I drilled holes in the stone, and just bolted them on. (look at the lower left mirror for a detail) A masonry bit in a hammer drill goes right through the stone. Bricks are much harder. The holes are two inches from the edge of the slab. I originally thought that the stone might shatter that close to the edge, but its not a problem.
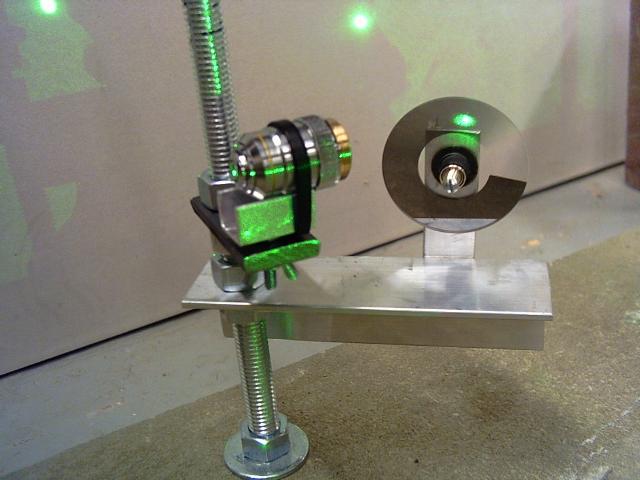
Most of the mirrors are mounted on adjustable mounts salvaged from an eye tracker. The upper left mirror is not, that mount is made from 1 1/2 inch aluminum angle, for the bracket on the rod, and a 1 inch aluminum angle on the back of the mirror. The mirror itself is held on with washers on three #4x40 machine screws, in tapped holes.
The beam splitter (lower right corner) is a big chunk of Plexiglas, about an inch thick, which is just stuck between two washers and nuts on the rod. (Cheesy, but it worked in the interferometer... :-)
The laser (a Compass 315M) is to the right, off camera, sitting on some bricks. The beam enters through a hole in the cardboard baffle on the lower right corner. The object illumination beam is folded up on the lower edge, to match the length of the reference beam (they are about 67 inches long), going up along right edge, and top edge.
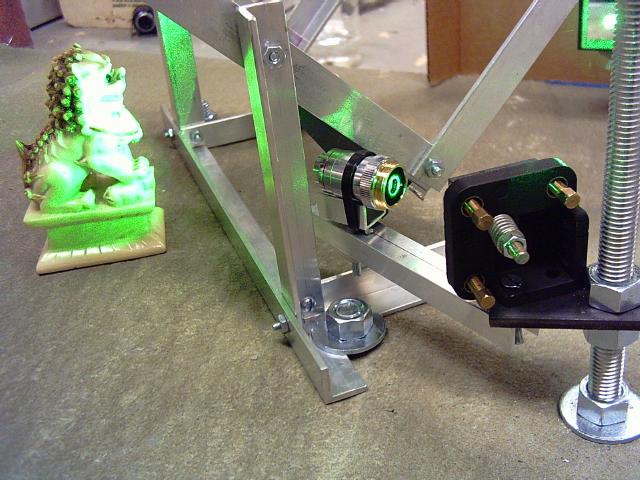
The reference beam is widened by a 10x microscope objective. The lens is cable-tied to a piece of aluminum channel, which has a #8 bolt bolted to it (note the distance between the bottom of the channel, and the bracket from the rod, there's a nut in there). That bolt then goes through the bracket on the threaded rod, and through a wing-nut on the bottom. Y adjustment is done by moving the two nuts on the vertical rod. X adjustment is done by swiveling the bracket around the threaded rod (which also changes Z...) rotation around the Y axis is done by loosening the wing-nut. There is no rotation around the X axis. Fine adjustment is then done by cheating with the steering mirror mount in upper right corner....
Just up-stream of the microscope objective is a variable beam splitter. The beam splitter is 1/8 of an inch thick, and so has nasty internal reflections. I haven't gotten a thick piece of glass to cement to it yet. (Home Depot does not sell any glass, and Lowes has only 1/8 inch. I am shopping at the wrong places.) The internal reflections are also why the variable beam splitter is not being used as the main beam splitter...
The film holder is held down with two carriage bolts, instead of the longer threaded rods. It is angled relative to the table, to get a reference beam angle of 45 degrees from "above". That unfortunately means the object stage is tilted, but avoiding having an extremely tall mirror structure simplifies the rest of the system. You can see tape for aligning the film on the glass, as well as how the glass sandwich is held on with binder clips. The two extra pieces of aluminum jutting out from the back of the plate holder are for a shelf. The film holder started life as a Denisyuk hologram film/object holder.
Object illumination is with a 40x microscope objective, mounted the same way as the 10x reference beam lens. The plan is to put a second beam splitter under the current beam splitter, and have two illumination beams, but thats still on the todo list (as is rotating the film holder to have a horizontally angled side reference beam, and hardware for doing H1 H2 copies).
I have made some holograms on this table. And they even came out. Unfortunately the still-video images of them did not... (But then again, my digital camera is only slightly above the $10 Barbie-special.)